Sleek ponytail
For this look it is best to wet the hair (at lest the fringe), and dry it with a hairdryer so that it goes backwards, no parting. Use a brush and gently brush the hair so that the hair is nice and smooth. If the model has very curly hair you can straigten it, however, this look requires a lot of products anyway so you can just straighten the ponytail at the end, which saves you a lot of time.
You can backcomb the fringe to create a poof and lift, or have it slicked back. Lottie showed us a very simple technique of how to get the hair up without struggling, expecially the model has very long or thick hair.
Use your pintail comb to find the highest point (best position for the high pony tail) by placing the comb from the ear, diagonally, towards the crown area. Where the comb points to is where your pony tail will look best on your model.
Section the fringe (from the temple to the highest point) and clip it.
Before styling
Sectioning
Use a bungee hair band to secure the pony tail, it is easier to keep the shape, plus you won't pull your model's hair too much.
First part of the pony tail secured with a bungee
Then go back to the top section. At this point you can create a poof, or join it with the rest of the hair and make it very sleek.
I did a sleek look by combing and joining the section to the pony tail and secured it with another bungee. To smooth the hair down I used sea salt spray and water.
As a finishing touch take a section from the bottom of the ponytail. Comb it and hairspray so that it is nice and smooth and wrap around the bungee to hide it.
If there are any baby hairs left you can use hairspray - hairspray and a toothbrush work best, and smooth the hair.
Sleek ponytail secured with second bungee
Sleek ponytail secured with second bungee
Sleek ponytail secured with second bungee
Sleek ponytail secured with second bungee
Sleek ponytail - final look
Sleek ponytail - final look
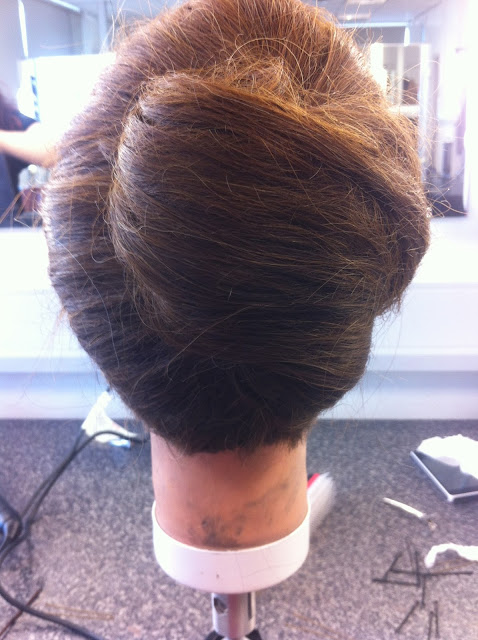
French Pleat
A french pleat, or a twist is a very simple, yet elegant hairstyle. We created a very sleek (bridal) version, and editorial (avant garde).
Start by sectioning the hair as you did for the high ponytail. This look requires curls, as they will help with the structure. Curl all around the head, leaving out the top section, in the direction that you want to twist the hair in.
Sectioning the hair
Curling
Hair after curling
I have lost the image of the backcombed hair, but after you have curled the hair, backcomb each section to get lift and volume all the way round. Add hairspray for more sturcture if needed.
I created an editorial look first, then the bridal. I joined all the hair together and, with my denman brush. My twist is on the right side so first I took the section from the left side and pinned it slightly off the centre. Make sure that it is smooth and that the grips are keeping the hair in place. Also, I sprayed it with water and it helped me smoothen the hair. Then, joining that section, and the right section, I twisted the hair in a cone shaped roll and pinned it. Use pins to help create the shape of the twist and keep it secured.
Pinning the left section
Pinning the left section
Hair twisted and pinned
Hair twisted and pinned
Then I took out the top section and backcombed it and twisted into sort of like a barrel curl and pinned it down. Then, using pins, I've styled it so that you can't see the holes and I used them to make sure the hair stays in place.
French pleat (editorial)
Final look
French pleat (editorial)
Final look
French pleat (editorial)
Final look
French pleat (editorial)
Final look
Then I took all the pins out (apart from the ones that were holding the left section in place) and pinned the fringe. I've used my comb to make it a bit more smoother than it was for the previous hairstyle, then twisted the section once and pinned. This way I kept the lift of the hairstyle, and then you twist the hair again, and pin in place like in the hairstyle above.
French pleat (bridal)
Final look
French pleat (bridal)
Final look
French pleat (bridal)
Final look
French pleat (bridal)
Final look
(all looks created on: Mar 1 2 2016)
I really feel like my skills have improved a lot throughout the past few weeks and I am quite proud of what I have created this week.


Nema komentara:
Objavi komentar