nedjelja, 27. ožujka 2016.

Reflecting & Planning

Easter break is here and the To Do list is completed. 

Week 9 To Do list


The test shoot on Wednesday went very well and I will be doing my actual shoot on either April 5th or 6th, when both me and Beth are back in Southampton. The catwalk shoot will take place in that week most likely, and the editorial shoot is on Wednesday 13th, but I will be doing a test shoot before that, only need to see when - need to test the look and lighting. 

I've done a lot of face and hair charts this week which I have all posted, as well as the looks on my hand. I practiced the editorial make up look and that is sort of what I want to create for my final look, but it has to be neater, and the evening look not AS shimmery. 

I am spending a week in London, visiting family friends, so I am taking a week off to relax, but knowing me, my mind will be constantly thinking of what I could add/ change/ do in my designs and add to the blog. 
I didn't make a To Do list now, I will be doing it next weekend.

Editorial Looks | More Eye Charts (On My Hand)

More eye looks on my hand. I focused more on cool toned shimmers and not the pinks and glitter as I did last time. 5th, 6th and 7th looks are my favourite, the combination of silver, blue and purple looks.
I tried using false lashes, like Ellis Faas did for her 'model' snow, but these are too stiff and it didn't look right. 
The products, just like the last time, I've written on paper and took a photo with it


1st Eye Look

Day look. 
Blue metalic look, wet and dry application; dry all over and wet on the centre of the eyelid. 
This is the look where I tried adding lashes to create a better look, but it didn't work so I decided not to use it in other designs.


1st eye look

2nd Eye Look

Evening look; purple, pink and silver.


2nd eye look

3rd Eye Look

These colours are actually pink but this is how the camera picked up which is a bit annoying. I mean, gold is nice too, but this look wasn't supposed to look like that.
Anyway, the first image shows the day look, then I added gloss (second image) to change it to daytime.


3rd eye look - without gloss

3rd eye look - with gloss

4th Eye Look

This is an evening look where I combined cool and warm tones - goldish tones in the inner corner and purple/ silver in the outer.


4th eye look

5th Eye Look

Purple smokey look. Even though it is quite dark, I'd use it for the day look as it is very metalic.


5th eye look


6th Eye Look

For this look I tried using the torch on my phone to show the shimmer, it turned out quite blury as it wouldn't focus, so I put two photos up. This would be a day look - very shimmery silver/ pink with a grayish purple across the lash line and into the crease slightly.


6th eye look

6th eye look

7th Eye Look

Another mixture of warm and cool tones. This would be the evening look, to change it to day I would add gloss.

7th eye look
7th eye look + Mythology (MAC)


Editorial Look | Practice

Last night I practiced this look on one of my models, Gabby. She will be my catwalk model but I wanted to practice one of my editorial ides as I haven't had much practice with it. The lighting was pretty bad as it was the evenng, so we used the torch on her phone and moved in different angles to try and capture the make up for what it really looked like. 

I also did her hair, but actually not for this look, I did it for her work and I practiced this look when she got home from work, but it goes well with the make up. The colour of her shirt also goes well with the SS16 inspired look. She looks very 90's actually when you look at the overall look.

The products used: 

Primer: Primed & Ready Illuminating Primer (Collection)
Foundation: 125 Natural Rose (L'loreal Infallible) + Vaseline
Bronzer: Instant Glow Cream Bronzer (Seventeen)
Highlight: Hypnotic Strobe Balm (Revolution) + White Pigment
Eyes: Happily Ever After, Daphne Grand Duke + Fairy Godmother (Enchanted Forest eyeshadow palette -Sleek) + clear gloss (Maybelline)
Lashes: The Falses Push Up Drama (Maybelline)
Brows: Vaseline
Lips: 01 Minty Sheer (Maybelline Colorsensational lipgloss)


I primed her face and applied a little bit of foundation to even out her complextion. I also added a tiny bit of Vaseline while I was bleding the base with my beauty blender and fingers as I wanted to make her skin nice and glowing.. Then, with my ring finger I applied the cream bronzer first, then the strobe balm, and blended both, and added the whine pigment on the high points of her face, focusing on the cheeks.

Then I applied some Vaselline all over her brows and brushed them with a spoolie to get rid of any excess product and to shape them. I used Vaseline because I want to achieve shiny, almost wet looks.
Next I took the blue shimmery colour from my Sleek palette -  Happily Ever After, and applied it all over the lids. I applied more product on the centre and blended it outwards. Then I added a bit of a darker shade (Daphne) to the outer corner and a baby pink (Fairy Godmother) to the inner, and blended everything with the same brush I used to apply and blend the lighter colour. White pigment was applied with a tiny brush to her tear duct area. On her bottom lash line I applied the pink tone in the inner part and the blue colour I used as a base in the ea
A single coat of mascara on top of bottom lashes and some clear lip gloss completed the evening look.

Evening editorial - without mascara
Evening editorial
Final look
Evening editorial
Final look

It is weird to me to be changing the look from evening to day, and it confuses me at times, even though it is all my desing and concept. The day look is wet, 'just god out of the ocean', therefore the eyeshadow is more opaque (not that the one above wasn't), metalic and the lashes are clumpier and brows messier.

I added a blue/purple shade Grand Duke, using an angled brush, across her lower lash line, and took it slightly upwards, sort of like flicked cat eye. Then I added the white pigment on her brow bone and, to her tear duct are again, but with a wet brush. Finally, I applied clear gloss on the centre of her eye lids and added a couple layers of mascara on her top lashes to make them clumpier.


Final day look (all images above)
(created on: Mar 26 2016)

I absolutely love this eyeshadow palette and the shades I used. However, I did put a bit too much in my evening look (the first one I did). The lighting wasn't good and I didn't see properly until I turned the torch on. Next time I create the look I will focus on applying the product on the centre of the lid only, then blend it with a clean fluffy brush. I may add a pink toned lip gloss, too. I may also add eyeliner, but I quite like how everything looks without it. Maybe I should try using the darkest shade I used, Grand Duke, across the top lash line, too. 
The hair for the day look with be wet, and for the evening in a low pony tail / braid - don't have final looks yet. I don't want to do dutch braids again because I did them for my catwalk. 

petak, 25. ožujka 2016.

Advert Test Shoot

A few images from the test shoot I did for my advert on Wednesday. For some reason all of my photos ended up being RAW files so I had to use a website (https://raw.pics.io/) to convert each image into a JPG which was a bit of a pain as I had to convert one by one. I have no idea why I had no JPG files, every time I shoot anything I get a RAW and JPG file for each image. 

Pleased with the images I took for the advert, however I will be re-shooting. I showed her the images I had saved to show her the poses and it was so easy to shoot with her. 
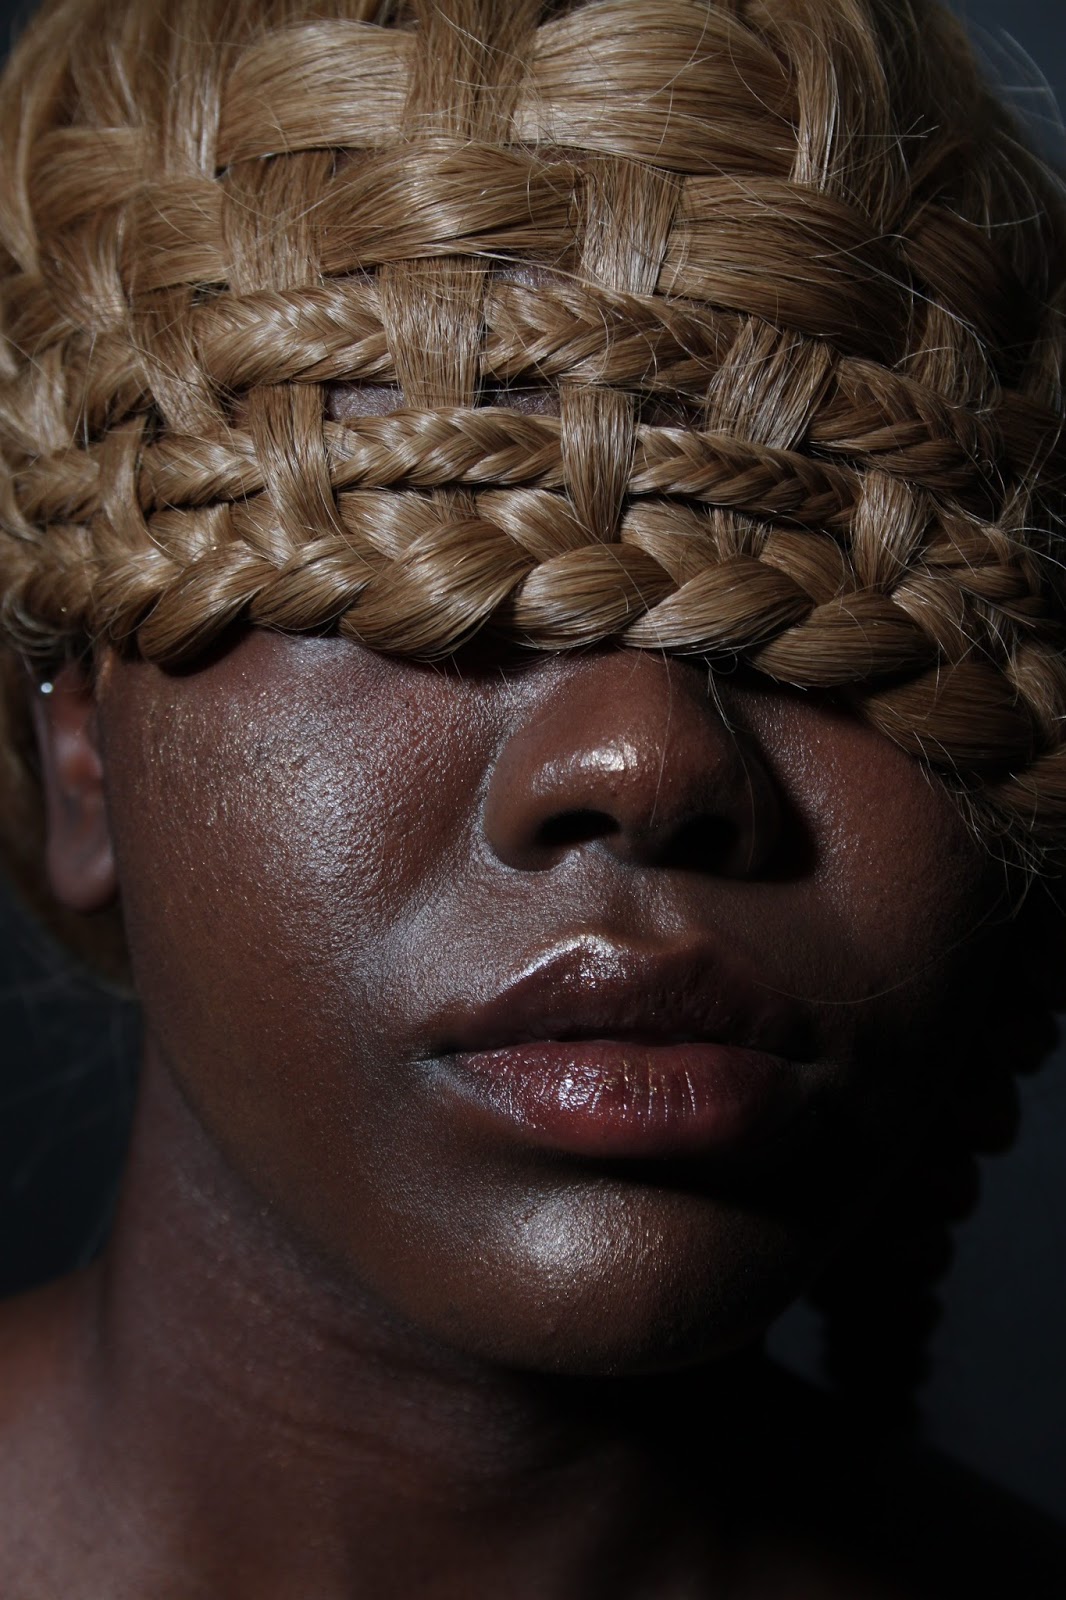
I am really happy with the way the light had hit her cheek bones, as well as the contrast between her skin, wig and the background. The wig doesn't look unnatural which is most important, but at the same time we can see that it is a wig. It also reminds me of a summer hat that we'd wear to protect our faces from the Sun. 
The face charts and the list of products are the same as my original designs that was posted in my 'Final Advert Face Charts' post.

Here are my favourite photos for the highlighter. While shooting I had in mind that I had to add the quote and logo so I left some space, I can always crop the image later. Somewhere at the level of her collar bone/ shoulder I want to have the logo and the quote, or maybe have the quote in the level of the wig - I will play with the positioning once I get to the post-production. As you can probably see, the light was on the left, directed to her cheek bone. I shot in one of the booths on the fourth floor. Everyone was shooting that day and I couldn't use the Canon 550D, the guy in the hutch gave me a 500D which worked just as well. She was sat on a chair while I was moving around taking images from different angles to find the one where the lighting is falling perfectly on her cheek bone - I used the beauty dish.
The images that captured the highlighter best are the first and second below, as well as the fifth, sixth and eight. When it comes to poses, The most beautiful was the one that I shot from below, fourth image, and I also like the ones where she was turned to the side better than the ones shot from the front (ninth, tenth).


First image
Second image
Third image
Fourth image
Fifth image
Sixth image
Seventh image
Eight image
 Ninth image
 Tenth image

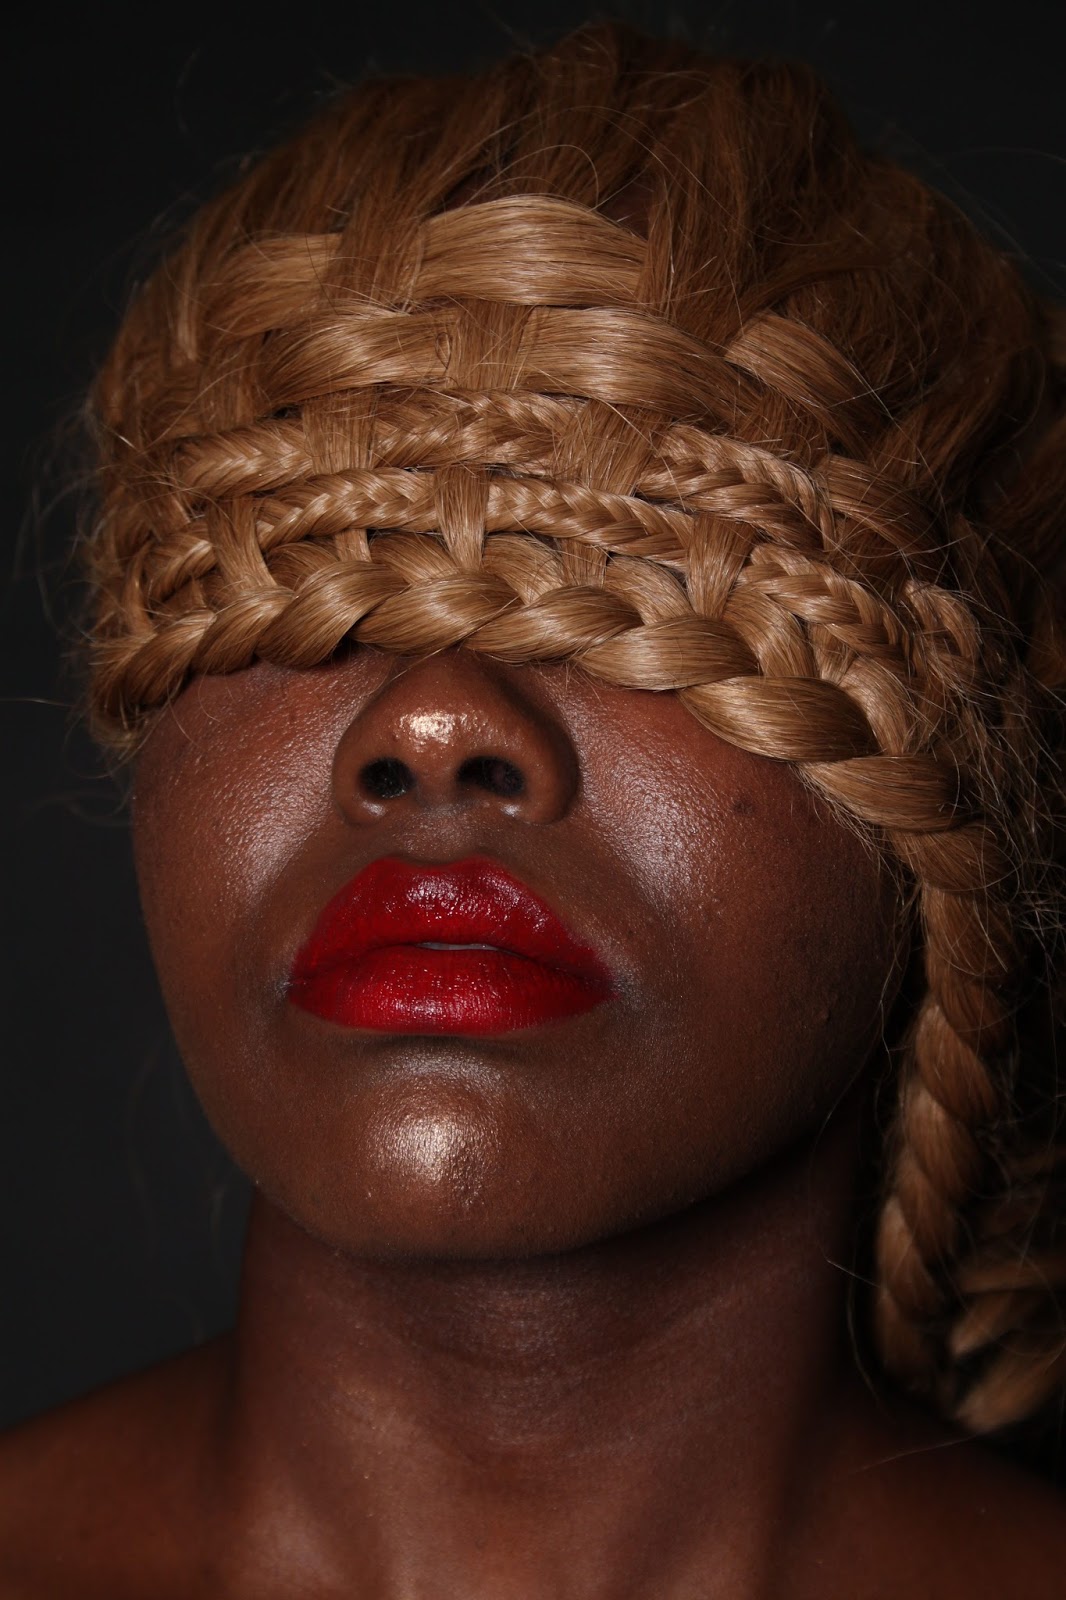
The lips I don't like because they kept going really patchy and the light was picking up on that a lot. If it is a lipstick advert, I need the lips to look flawless. Next time I will use a lip liner and Red Lip Pigment by MAC that I have as I think it will apply more evenly. 

Most of the lip shots were from the front, as I said I wanted them to be ('Poses For My Adverts' post). The images where she had her chin up looked best, in my oppinion, as the lips really stood out - sixth and seventh image, but I like the second image as well.

The light in the first image was still on the left side, as I wanted to have more options and see what looks best, but then I put the light just above my head, having the light reflecting directly to her face as it made the lip colour look more even. I didn't shoot only trom the front, I moved to all sides, again, to have more options later.

The third and seventh image are the two I'd choose to edit for my advert, if I had to. 

First image
Second image
Third image
Fourth image
Fifth image
Sixth image
Seventh image

Then I decided to start playing with the camera settings, as when I did my test shoot I did use a setting that made the image warmer. I found an image of the camera settings on the Canon website, to tell you exactly which settings I used to get what image, as I can't remember the names of each one by heart.

White Balance Settings
Canon 500D
Canon website
(source: http://support-sg.canon-asia.com/contents/SG/EN/8200495000.html
Accessed: Mar 25 2016)

The first setting I tryied was the third icon (shade) which made the exposure higher. I didn't like it - too bright (first image). Next I tried the sixth setting (Flourecent Light) but it made the one of the image too cool, so I tried the setting next to it, that Simon showed me, which creates a warm tone (Tungsted Light). This made Jazmine's skin look so perfectly bronzed when I photographed her ('Testing The Lighting For My Advert' post), but because Beth has a much darker skin tone than her, and in combination with the blonde wig, I really don't like it (third-eight image). 

First image
Second image


Images 3-8
Model: Beth Kabuga
Date of photoshoot: Mar 23 2016


My next shoot will be between April 5th and 8th, when both me and Beth come back in Southampton / when she is free. I will be using the camera settings that I normally use, without the warm/cool tones and will be using different lip products. The products for the highlighter advert will be the same, but I will blend it a bit more as it does look slightly unnatural. 
Also, I used only black background in both shoots, but next time I will use both gray and white, then see what looks best.

ponedjeljak, 21. ožujka 2016.

Final Advert Face Charts/ Designs

Here are the two designs I decided to use in my adverts. 
The highlighter advert for the Dual Intesity highlight will be the day look, and then that same look, with red lip colour added will turn into an evening look - Audacious lipstick advert.

Highlighter Advert:

Products used:

Foundation: N9 AC4 (MAC Studio Face & Body) 
Concealer: Toffee (L.A. Girl Pro Concealer)
Bronzer: Bronzing Sun (Kryolan)
Contour: Chocolate Brown (LaRoc)
Highlight: Gold Pigment
Lips: LCP694 (Kryolan)


Highlight advert face chart

Lipstick Advert:

Products used:

Foundation: N9 AC4 (MAC Studio Face & Body) 
Concealer: Toffee (L.A. Girl Pro Concealer)
Bronzer: Bronzing Sun (Kryolan)
Contour: Chocolate Brown (LaRoc)
Highlight: Gold Pigment
Lips: 170 Alarm (Rimmel) 

I might add gloss on top of the lipstick, will see how it turns out on camera first.


Lipstick advert face chart


These are the face charts for the shoot that I will be doing on Wednesday (March 23rd). You've seen the hairstyle on the wig that I've styled in the post titled 'Trying On The Wig & Final Look For My Advert'. The preparation for the shoot won't take too long as I will just be changing the lip colour so I am not worried at all. I will let you know how it goes after I've shot it, and seen what the look looks like on camera as I might have to change some things if they don't work. 

nedjelja, 20. ožujka 2016.

Reflecting & Planning | Week 9

This was the first week where I actually managed to fully complete my To Do list. I did add some more things to do as the week was going on to the list; the make up practical, styling my wig and the final look I create and the Tahiti Bronze advert video I found on YouTube but haven't had the time to post yet.

Here's the list: 


Week 8 To Do list

A couple of other things that weren't on the list are the posts with poses that I had found to show my models when I do my shoots with them. I figured if I had them saved I might as well upload them onto the blog. 
I scheduled my advert shoot with Beth for next Wednesday. I will do it in the photo booth on the fourth floor. I will be using the beauty dish and a Canon 550D to take photos with. In my tutorial with Kat she suggested I try a background - I was thingking of using black or white, so I will try to use all three just to have more options. I am really happy with the way the wig turned out which you have seen in my 'Trying On The Wig & Final Look For My Advert' post. 

The eye make up looks that I have created on my hand for my editorial looks were really fun to create. This way the make up comes out almost exactly how it would look like on the eyes, expecially the shimmers and gloss. I've written all about them and how I got the idea to do them from Ellis Faas in my 'Editorial Looks | Eye Charts (On My Hand)' post that I posted today. I will be creating more during the next week and posting them before Easter for sure. 

Beth is my model for the adverts, I was planning to use my friend Gabby for my editorial shoot and I didn't know who to use for the catwalk as I couldn't find anyone who I felt suited the look. Kat told me to contact a girl from level 4, Pepe Upton. After looking at her photos I realized that she would really suit my editorial shoot, therefore Gabby will be my catwalk model and finally I don't need to worry about finding a model. I messaged Pepe and told her I would like to shoot right after the Easter break so we agreed to do it on Wednesday Apr 13. I am hoping to do my catwalk shoot over the Easter break but as my model works and doesn't know exactly which days she will have off, we haven't planned that just yet, but hopefully I will sort that out by the end of the week so I have that sorted. 

So the plan for this week is to do more face charts and eye charts on my hand for the editoral looks as well as hair charts. Practice included. As I said, I have a shoot on Wednesday so I will be posting that the same day along with the final look for the advert as I need to finalize that tomorrow and just create the final face chart with the list of all the products I will need.  
I will probably be adding more posts and things to the list as the week goes on but these are the things that I 100% need to do this week. 


Week 9 To Do list
(created: Mar 20 2016)