This week was brow week. We had to work on 4 different brows (models) and create three looks on each one. By consulting with our models, the first look has to be created the way our model usually does them and likes the. For the second look we do our model's eyebrows the way we think looks best and compliments their face, and the third look is a SS16 inspired look.
For this Spring Summer 2016 season we saw a lot of natural brows, a lot of them brushed upwards on the catwalk, but there were also some dark, thick and bold, as well as thin, some even bleached. At the Georgine show the brows were pink, and others designers had the make up like a mask around the eyes and it covered the brows - Chanel used blue and MaxMara's makeup designer used a peach shade.
There is a trick to knowing how to shape your brows. The way it works is you place a brush straight from the corner of your lip the side of your nose, that is where your brow should start. If you place the brush diagonally going from the middle of your lips to the side of your nose. Where the brush points to on your brow, that is where the top of your arch should be. If you place the brush on one corner of your lips, going to the opposite side of your nose, and it will point right where your brow should naturally end. Obviously not everyone will follow this and it all comes down to personal preferences, but if this is followed, the model will always have nicely shaped brows and won't look like a clown.
First Model
1st Look
My first model was Rachel. Rachel told me that she went to get her eyebrows threaded a few years back and they did a very bad job as they over plucked them. They never properly grew back and she likes to fill them in to hide that. Usually, she uses a slightly darker colour than her natural brow colour making the ends slightly darker and feathering the inner ends. By slightly overdrawing the arch she likes to add definition and shape. Also, the hairs of her eyebrows are quite thick and have a mind of their own so she always uses a sealing gel to keep them in place.

No make up
Her brows really are hard to tame and brush out, but that is what I did before adding the product. The product I used on this, as well as other two looks is the BeautyUK brow kit that comes with three shades of powders - light brown, chocolate brown and black. I like this product as it is very easy to apply, it doesn't smudge too much and stays on all day. To apply it I used an angled brush and a spoolie to comb the brows and to highlight and clean up the edges I used concealers from my Kryolan palette. I used black powder from my kit mixed with chocolate brown, however they didn't turn out very well. I tried feathering them out but as you can see, there was still a bit too much product and my model shad that they were slightly thicker than she normally does them. To clean around the brow I used a concealer that was a shade lighter than her natural skin tone.
To have a straight fine line I used water to wet my brush and have more control over the product - I did that on all three looks.

1st look
2nd Look
For the second look I decided to use more of the chocolate brown shade, and less black. I tried to just fill the brows in and shape them but at the end they pretty much turned out looking the was Rachel would normali do them, except the first time her right brow (my left) turned out better, and this time the right (her left) brow looked better. Again, too much product in the inner part of the brow.

2nd look (front)

2nd look (side)
3rd Look
This is the image I decided to use for my SS16 inspired brow. It is a look from Christopher Kane's catwalk show taken at London Fashion Week. I couldn't find out who the model is, but the make up artist for the show was Lucia Pieroni.
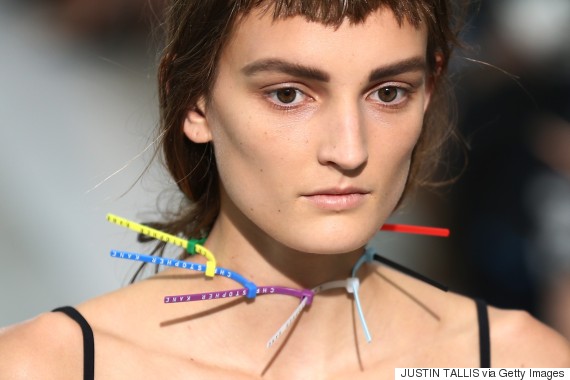
Christopher Kane
Spring/Summer 2016
London Fashion Week
Photographer: Justin Tallis - Getty Images
Posted by: UK Style - The Huffington Post
Sep 21 2015
(source: http://huffington1378.rssing.com/chan-24631977/all_p89.html
Accessed: Feb 11 2016)

3rd look (front)

3rd look (side)
I really need a lot of practice, although, the more I precticed, it obviously became easier to create the look and shape them - there was no adding/ taking out product, she took the make up off for every look and I started fresh. Wouldn't do a shoot with brows looking like this. Maybe on her brows a tin pencil would work and look a lot better, rather than a powder, or it could possibly work better if I were to use this same product and apply it with a much thinner brush.
Second Model
As there was an odd number of us in the lesson, Fenella was very kind and offered if I'd practice on her brows.

No make up
1st Look
She said she likes them looking natural and uses a tiny bit of product. I started by combing them. With a very light hand I applyied the chocolate brown shade from my brow palette with an angled brush to add some definition to the brows. There was no need for concealer as I wanted to keep them as natural as possible. She was happy with them.

First Look
2nd Look
The way I would do her brows is add just a little bit more product and definition, so she didn't have to take the make up off really, I just added a little bit of product.

2nd look
3rd Look
The inspiration for my Spring Summer 2016 inspired brow was taken from Mary Katrantzou's catwalk show. The make up artist, Lucia Pieroni lightly filled in the eyebrows and brushed them upwards creating a bushy, but still polished brow.

Mary Katrantzou
SS16
Hairstylist: Paul Hanlon
MUA: Lucia Pieroni
Vogue article: Spring Summer 2016: Backstage Beauty Bites
Oct 7 2015
Author: Lisa Niven
(source: http://www.vogue.co.uk/beauty/2015/09/14/spring-summer-2016-hair-and-make-up-backstage/gallery/1502096
Accessed Feb 11 2016)
Again, I kept adding the product on the brow that I had already created to change the look and make the brows stand out a bit more. Using a brown brow product that matches her brows, such as a brow mascara (couldn't see the name of the brand on the product) I brushed the hairs upwards. I applied two to three coats - until I was happy with the way they looked, then brushed them out with a clean brush to clean up any clumps and excess product. At the end I used a concealer from my Kryolan palette to clean up the area around the brows.

3rd look (front)

3rd look (side)
Fenella's brows are shaped very nicely and they are very easy to work with. I also quite like this trend of brushing the brows upwards as it gives them a more grunge look.
Third Model
I created the third look at home, on my land lady, Pakinam. She wanted me to pluck her eyebrows, too. She never wears make up, let alone any brow products, therefore she likes to get them threaded regulary, and she felt it was time to get them shaped.

No make up
Before threading brows
1st look
As she never wears make up, for the first look I didn't apply any. But I did pluck them, even though the difference between this image and the image above is big, there were actually quite a few hairs that needed to be plucked. When I was done with shaping, I brushed them to make sure they are all in place.

1st look
Second Look
The way I'd do her brows is to add a little bit of product to fill the gaps and make the brow a bit stronger.
With an angled brush I applied a bit of chocolate brown shade mixed with the lighter shade to define the brows.

2nd look
I think that her brows do look a bit better with a bit of definition, however, on a bare face they might be a bit too strong. But she didn't want any make up on her eyes to and I respect that. Mascara and a natural matte eyeshadow would really bring out her eyes, I think.
3rd look
The inspiration for this third and last look was the make up from the Ralph Lauren SS16 catwalk as the models had minimal make up and the brow was strong, particulary on the model in this image. Tom Pacheux was the make up designer.

Ralph Lauren
SS16
Photo by: Indigital
MUA: Tom Pacheux
no date/uknown model
(source: http://www.vogue.co.uk/beauty/2015/09/14/spring-summer-2016-hair-and-make-up-backstage/gallery/1472498
Accessed: Feb 13 2016)
For this look I started with a no make up face (brow) again. Used the same brush and shades but created a sharper looking brow and my model was quite pleased with it and surprised how just by filling in her brows, they really shaped her face and make her eyes 'pop'.

3rd look
Fourth Model
After seeing how my land lady, looked my house mate, Caroline, wanted to see what would she look like so she was my fourth model. She never wears make up either, as a matter of fact, she never plucked her eyebrows either as she has bad eyesight. I offered to pluck them but she didn't want me to, so I worked with what I had.
1st Look
The first look is a no make up one, as that is how she likes them.

1st look
To define her brows I used the shade Caraway from my Kryolan eyeshadow palette mixed with a tiny bit of chocolate brown from my BeautyUK brow palette. I tried to create and arch and tried not to make them too thick but as her brows are quite thick, expecially on the ends, it was quite hard to avoid making them look thick.

2nd look
3rd Look
The look I was inspired by was created by Pat McGrath for Diane Von Furstenberg's Spring/ Summer 2016 collection, the model in the image is Gigi Hadid and I mainly chose this look as it was quite natural and not too defined and I thought would suit my model very well.
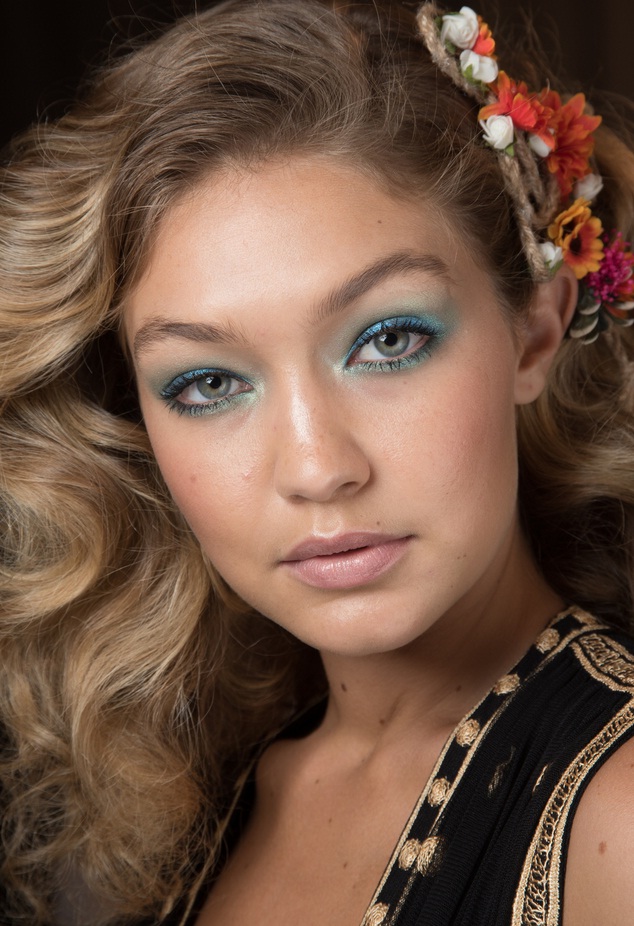
Gigi Hadid
Diane Von Furstenberg
SS16
Makeup by: Pat McGrath
(source: http://bbs.movie.daum.net/gaia/do/movie/menu/star/photo/read?articleId=146072&bbsId=P001&searchKey=meta&searchValue=2%3A338350&pageIndex=1
Accessed: Feb 13 2016)
(source: http://bbs.movie.daum.net/gaia/do/movie/menu/star/photo/read?articleId=146072&bbsId=P001&searchKey=meta&searchValue=2%3A338350&pageIndex=1
Accessed: Feb 13 2016)
What I did was I added a darker tone towards the end of the brows and under, on the line where the hairs are growing from.

3rd Look (front)

3rd Look (side)
All looks created on: Feb 10 216
She was so happy with the way she looked that she agreed that I pluck and shape her brows, but she didn't want me to do it that night.
Brows became a very big deal in the past few years and everyone (well almost everyone) uses different products to define them and make them 'on fleek'. I feel like I have mastered doing my own brows and powder works very well for me. Turns out, it doesn't work on everyone's brows, expecially not the thicker ones. As I said, it might work with a very fine brush.
Also, when I do my model's brows I always follow the natural shape of the brow. First I do a line under the brow towards the arch, then above, from the highest point of the arch, down to the tail of the brow which I try to make thinner and sharp. But what I need to pay more attention to is that no ones brows are exactly the same and to make them look the same I can't just follow the way the hair naturally grows. Obviously the brows won't look the same and one of the reason we shape them is to balance out our face and the goal is to make them look as similar as possible. So I have a lot of practice ahead of me.
Nema komentara:
Objavi komentar